Welcome to My Homelab!
An introduction to my homelab, and everything running within
This will be the first in an series of posts about my homelab setup. But first, what exactly is a homelab?
A homelab, in the simplest terms is a sandbox that you can learn and play with new or unfamiliar technologies. They can be as simple as a set of VM’s on an old PC or laptop… 1
The complete source mentioned in this post can be found over in the GitHub repository:


Please note that this is not intended to be an exhaustive tutorial for any of the tools that I use, but simply an overview of how I’m using them.
Overview
If all you’re curious about is what services I’m running, I’ll put that up front!
- Cloudflare DDNS - Dynamic DNS for domains which are managed by Cloudflare
- Grafana - Dashboards
- Homebridge - Apple HomeKit compatibility for smart home devices which don’t offer native compatibility
- Homepage - Application dashboard and landing page for my homelab with bookmarks to most of my services
- InfluxDB - Time series database that stores homelab metrics
- Pi-hole - DNS-level ad-blocker
- Pi-hole InfluxDB Monitor - Export Pi-hole metrics to InfluxDB
- Plausible - Privacy-respecting analytics
- Plex - Movie and TV show library
- Portainer - Container management platform that I use simply for monitoring logs
- Prometheus - Another time series database for storing metrics
- Prometheus VMware Exporter - Export VMware stats to Prometheus (I had forked this repo from somewhere and pushed it as
avojak/prometheus-vmware-exportera long time ago, but it has since disappeared…) - Scrypted - Home video integration platform that I use for integrating my UniFi security cameras with Apple HomeKit
- Speedtest - Runs periodic network speed tests and records the results in InfluxDB
- Telegraf - Agent for collecting realtime metrics from clients that I use to monitor my VMs
- Traefik - Application proxy that I use for routing traffic coming into my homelab, as well as within
- Uptime Kuma - Simple uptime monitoring for servers, applications, and more
You can check out my Pi-hole InfluxDB Monitor over on GitHub:
I also have a blog post about how I created a Grafana dashboard for all the metrics:
The Hardware
My setup is always evolving, but for now I am using a total of six physical servers: five Mac minis and one custom-build rack-mount server. Each server will be running VMware ESXi as the hypervisor. In a nutshell, a hypervisor is what is installed on the bare metal machine (host) to run and manage virtual machines (guests). The hypervisor provides the guests with isolated, virtual hardware on which to run.
I chose ESXi because I’m familiar with it, although I would like to give Proxmox a try at some point in the future.
Automation and Configuration-as-Code
Using virtual machines is not a necessity, however there are many benefits. At scale, virtual machines can be spun up or down as demand ebbs and flows. In a small homelab setting, using virtual machines allows me to easily move between hardware hosts, create backups, and quickly test and rollback changes.
When I first set out building my homelab a couple of years ago, my goal was to learn some industry standard tools. Sure, it might be overkill, but part of the fun of a homelab is having an environment to learn in! I have since been able to bring all of this experience into my day job to deploy applications enterprise-wide!
The three main pieces of the puzzle that I’m going to tackle in this Part 1 post are:
- Creating the guest OS image using Packer
- Deploying the guest VM using Terraform
- Installing software VM using Ansible
There isn’t a particular reason I chose each of these tools over others that are available. I already knew about them, so I decided to give it a go!
Packer - Creating the OS Image
What is Packer?
Packer is an open source tool for creating identical machine images for multiple platforms from a single source configuration. … A machine image is a single static unit that contains a pre-configured operating system and installed software which is used to quickly create new running machines. Machine image formats change for each platform. Some examples include AMIs for EC2, VMDK/VMX files for VMware, OVF exports for VirtualBox, etc. 2
Why use Packer?
There are already images available for server operating systems, so why create your own?
Pre-built images a great, but think about what happens when you install it for the first time: you click through the installer, pick some date/time/keyboard/location options, create a user, etc. etc… Definitely not something I want to repeat every time I deploy a new VM!
With Packer, I took the Ubuntu 22.04 LTS Server ISO and created an OVA image file to deploy to ESXi. The OVA has Ubuntu Server already pre-installed, pre-configured, and an SSH key is setup for use later on with Ansible!
How?
Packer uses JSON template files to define how to build and provision images. My template file was largely influenced by this post: How to use Packer to Build an Ubuntu 18.04 Template for VMware vSphere. Even though I’m ultimatel not using vSphere, the process is nearly identical.
The builders block defines basic information about the ISO to use, the commands to run on boot to automate the installation, and where to place the output image upon completion. Note that some details, such as the memory, can be modified once the image is actual used to provision a VM in ESXi.
1
2
3
4
5
6
7
8
9
10
11
12
13
14
15
16
17
18
19
20
21
22
23
24
25
26
27
28
29
30
31
32
33
{
    ...
    "builders": [
        {
            "type": "vmware-iso",
            "guest_os_type": "ubuntu-64",
            "memory": 1024,
            "name": "{{user `vm_name`}}",
            "iso_url": "{{user `iso_url`}}",
            "iso_checksum": "{{user `iso_checksum`}}",
            "http_directory": "{{user `vm_name`}}/http",
            "boot_wait": "10s",
            "boot_command": [
                "c<wait>",
                "linux /casper/vmlinuz --- autoinstall ds=\"nocloud-net;seedfrom=http://{{.HTTPIP}}:{{.HTTPPort}}/\"",
                "<enter><wait>",
                "initrd /casper/initrd",
                "<enter><wait>",
                "boot",
                "<enter>"
            ],
            "shutdown_command": "echo '{{user `password`}}' | sudo -S shutdown -P now",
            "ssh_username": "{{user `username`}}",
            "ssh_password": "{{user `password`}}",
            "ssh_port": 22,
            "ssh_pty": true,
            "ssh_timeout": "1800s",
            "ssh_handshake_attempts": "20",
            "output_directory": "{{user `vm_name`}}/build"
        }
    ]
    ...
}
The user-data file provides cloud-init configuration for the language, keyboard configuration, user creation, etc.
Note: In a real-world setting you would not want to use a static password here. In my case I’m only using that password during the Packer build - when it comes time to deploy, the Ansible will prevent password-based authentication for SSH.
1
2
3
4
5
6
7
8
9
10
11
12
13
14
15
16
17
18
19
20
21
22
23
24
25
26
27
28
#cloud-config
autoinstall:
  version: 1
  packages_update: true
  packages_upgrade: true
  identity:
    hostname: ubuntu-server-22.04
    username: provisioner
    password: REDACTED
  early-commands:
    # otherwise packer tries to connect and exceed max attempts:
    - systemctl stop ssh
    - systemctl restart systemd-timesyncd
  keyboard:
    layout: us
  locale: en_US
  timezone: UTC
  ssh:
    install-server: true
    allow-pw: true
    authorized-keys:
      - "ssh-rsa ..."
  late-commands:
    - sed -i -e 's/^#\?PasswordAuthentication.*/PasswordAuthentication yes/g' /target/etc/ssh/sshd_config
    - echo 'provisioner ALL=(ALL) NOPASSWD:ALL' > /target/etc/sudoers.d/provisioner
  storage:
    layout:
      name: direct
Within the provisioners block, we can define commands to run against the installed operating system. This allows you to install software and make other changes before the template is finalized.
There are other types of provisioners, but in my case I only wanted to accmoplish two tasks:
- Install software updates
- Install an SSH key
1
2
3
4
5
6
7
8
9
10
11
12
13
14
15
16
17
18
19
20
21
22
23
24
25
26
27
28
29
30
31
32
33
34
35
{
    ...
    "provisioners": [
        {
            "type": "shell",
            "inline": [
                "sudo apt-get install -y curl cloud-init python3-distutils",
                "curl -sSL https://raw.githubusercontent.com/vmware/cloud-init-vmware-guestinfo/master/install.sh | sudo sh -"
            ]
        },
        {
            "type": "shell",
            "inline": [
                "sudo rm /etc/machine-id /var/lib/dbus/machine-id",
                "sudo touch /etc/machine-id",
                "sudo chmod 444 /etc/machine-id"
            ]
        },
        {
            "type": "file",
            "source": "{{user `vm_name`}}/files/00-installer-config.yaml",
            "destination": "/tmp/00-installer-config.yaml"
        },
        {
            "type": "shell",
            "inline": [
                "sudo mv /tmp/00-installer-config.yaml /etc/netplan/00-installer-config.yaml",
                "sudo chmod 644 /etc/netplan/00-installer-config.yaml",
                "sudo chown root:root /etc/netplan/00-installer-config.yaml",
                "sudo netplan apply"
            ]
        }
    ]
    ...
}
The SSH key is provided at build time using a variable:
1
2
3
4
5
6
{
    "variables": {
        "ssh_key": ""
    }
    ...
}
The final piece of the template file is a post-processor to create the OVA file from the .vmx file:
1
2
3
4
5
6
7
8
9
10
{
    ...
    "post-processors": [
        {
            "type": "shell-local",
            "inline": [ "ovftool {{user `vm_name`}}/build/packer-{{user `vm_name`}}.vmx output/{{user `vm_name`}}.ova" ]
        }
    ]
    ...
}
With the vmware-iso type builder we get VMDK/VMX files for free, but I wanted to deploy using an OVA image (I had better luck deploying OVAs with Terraform). To do this I simply leveraged the ovftool from VMware 3.
Terraform - Deploying the VMs
What is Terraform?
Terraform is a tool to enable Infrastructure as Code.
Provisioning infrastructure through point-and-click GUIs or custom scripts is slow, error-prone, inefficient, and doesn’t scale. … With HashiCorp Terraform, provisioning and security can be automated with declarative infrastructure and policy as code. Infrastructure and policies are codified, shared, versioned, and executed within a workflow that is consistent across all infrastructure. 4
Why use Terraform?
Even though I’m working with a relatively small environment, Terraform allows me to quickly spin up, tear down, and replace VMs.
How?
I created an appserver module that allowed me to reduce a lot of duplication in my code:
1
2
3
4
5
6
7
8
9
10
11
12
13
14
15
16
17
18
19
20
resource "esxi_guest" "appserver" {
  guest_name = var.guest_name
  disk_store = "datastore1"

  network_interfaces {
    virtual_network = "VM Network"
    nic_type        = "vmxnet3"
  }

  guest_startup_timeout  = 45 # Seconds
  guest_shutdown_timeout = 30 # Seconds

  boot_firmware  = "bios"
  boot_disk_size = var.boot_disk_size
  memsize        = var.memsize * 1024
  numvcpus       = var.numvcpus
  power          = "on"

  ovf_source = var.ova_file
}
Then for each VM that I want to create, I simply invoke the module with slightly different settings. For example, for one of my Pi-hole servers:
1
2
3
4
5
6
7
8
9
10
11
module "pihole01" {
  source = "./modules/appserver"
  providers = {
    esxi = esxi.esx_mac_03
  }
  guest_name     = "pihole01"
  boot_disk_size = 25
  memsize        = 4
  numvcpus       = 2
  ova_file       = var.ova_files["ubuntu"]["amd64"]
}
Ansible - Installing Software
What is Ansible?
Ansible is a tool that enables automation of infrastructure. You write files called “playbooks” which define a series a idempotent tasks that configure infrastructure, applications, systems, and more.
Why use Ansible?
Idempotency is a key concept within Ansible, and this means that a well-crafted playbook can be run repeatedly and always have the same result. If something starts acting strangely on a server, I can re-run my playbooks to get everything back in alignemnt. Similarly, if I need to rebuild a VM, I simply have to point the playbook to a different server and it will setup all the services and applications just like they were before.
How?
I decided early on that I wanted as many applications as possible to be installed via Docker. This has a few advantages:
- Software is installed, managed, and monitored consistently
- I can easily update/replace the underlying VM with little to no effect
As a result, most of the VMs that I have in my lab are really just Docker hosts, and most of my Ansible roles simply drop in Docker compose files.
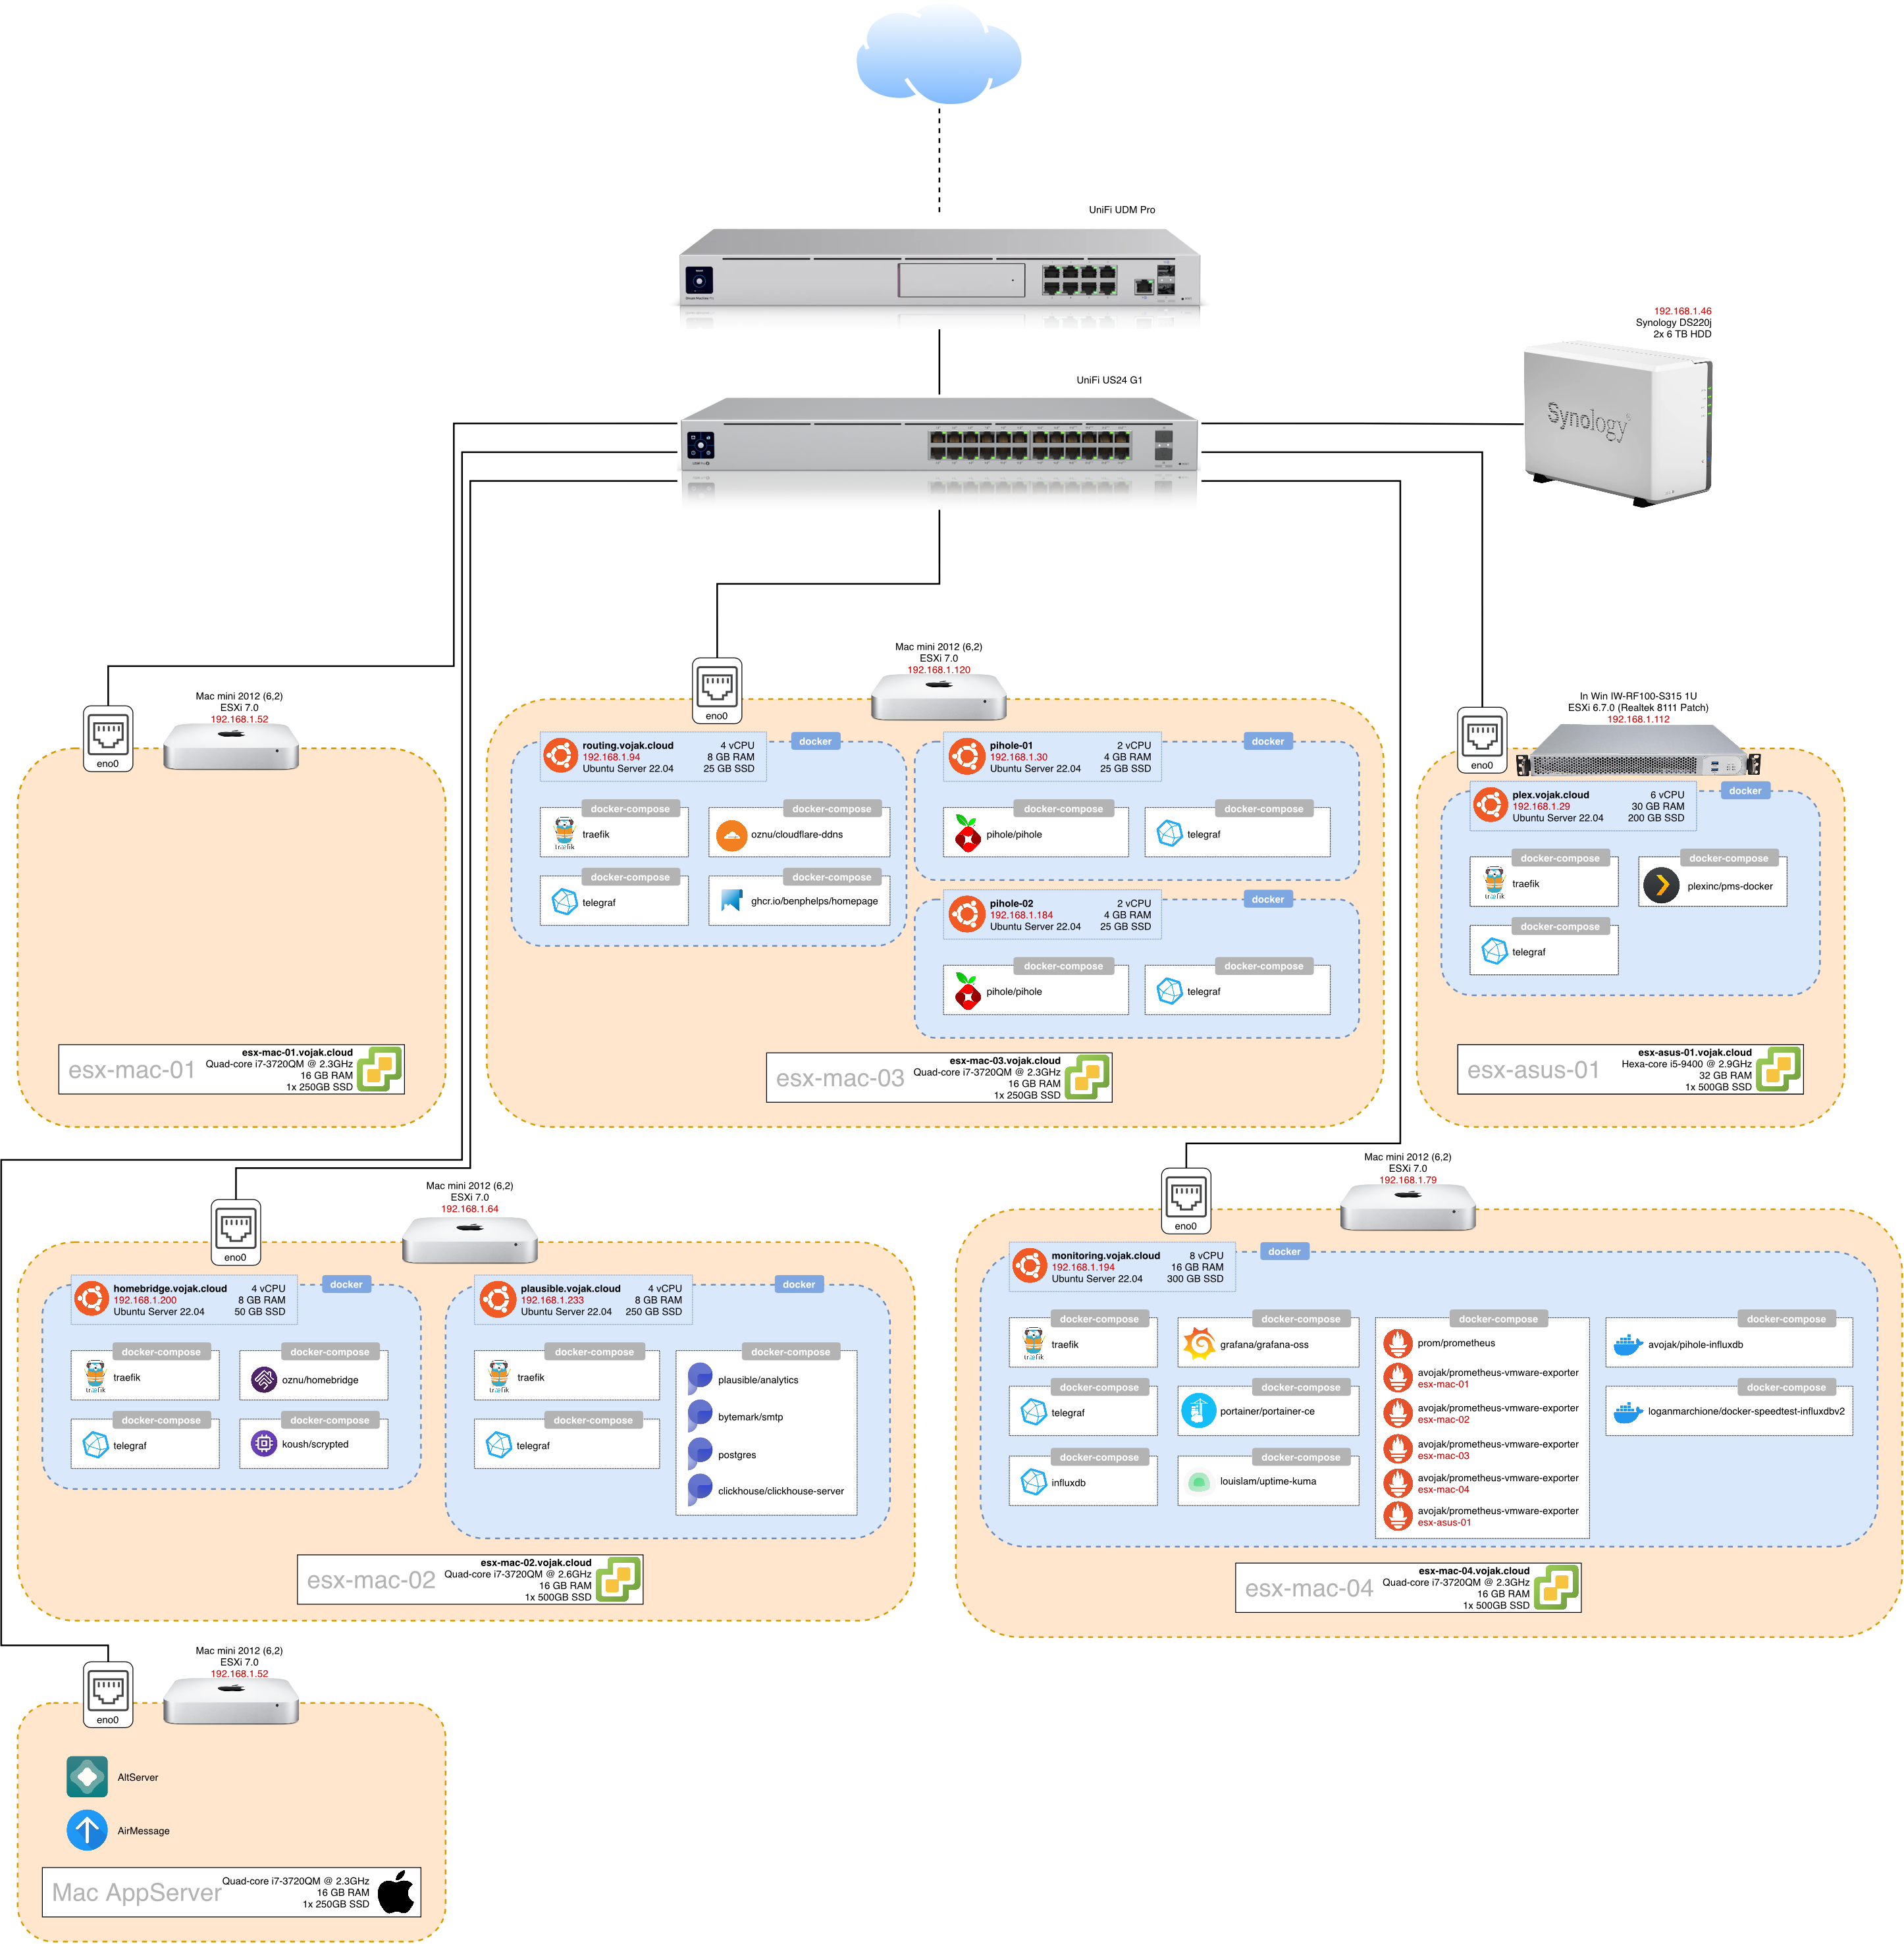
End Result
After all of that, I finally spent a bit of time putting together a diagram of all the services that I’m running: